A first paint job tends to produce the full catalog of defects: roller streaks, a drip dried into a permanent stalactite, tape lines so jagged the wall looks chewed. The dull truth professionals repeat is that the painting is the fast part — preparation is the job. This guide walks the whole sequence in order, from wall-washing to tape-pulling, with the manufacturer guidance and the two EPA warnings worth knowing before you open a can.
Prep is the whole job
Clear the room, or pull everything to the center and cover it. Remove outlet covers, switch plates, and everything hanging on the walls. Then wash the walls — really wash them. Benjamin Moore's room-painting guide puts cleaning before everything else for a reason: grease and dust stop paint from bonding, and kitchen walls especially carry a film you cannot see. A sponge with diluted dish soap, a rinse with clean water, and full drying time.
One safety check first: if your home was built before 1978, the EPA warns it is likely to contain lead-based paint under the newer layers — the federal ban on consumer lead paint took effect that year. Intact paint in good condition is not an emergency, but do not dry-sand, scrape, or demolish old painted surfaces without testing first; hardware-store lead test kits are cheap, and deteriorating lead paint is a job for certified professionals, not a weekend DIY.
Assuming you are clear: fill nail holes and dents with spackle, let it dry, and sand smooth. Scuff-sand any glossy areas so new paint can grip, then wipe the dust off with a damp cloth. Tape slowly, pressing the edge down hard with a putty knife — loose tape is where bleed comes from. Lay canvas drop cloths rather than thin plastic, which turns slippery the moment a drip lands on it, and tape the cloth's edge along the baseboard so it cannot creep. This stage takes longer than the painting, and it is not optional.
Buy the right amount while you are planning: measure the wall lengths, multiply by height, subtract the big openings, and divide by the coverage figure on the can — most interior paints cover roughly 350 to 400 square feet per gallon per coat. For a typical 12-by-12 bedroom needing two coats, that lands around two gallons of wall paint plus a quart for trim. Rounding up slightly is cheap insurance; a matched touch-up gallon bought a year later rarely matches as well as paint from the original batch.
What to buy and what to skip
Painting punishes cheap tools more than almost any other home job. The short list that matters:
- A good angled brush. A 2.5-inch angled sash brush from a reputable maker cuts a clean line a bargain brush never will, and does not shed bristles into the wall. Benjamin Moore's guide specifies exactly this brush for cutting in.
- The right roller cover. Match nap to texture: 3/8-inch for smooth walls, 1/2-inch or more for textured surfaces. Cheap covers shed lint into the finish.
- Quality paint. Better paint covers in fewer coats, which often makes it cheaper per finished wall than the bargain gallon that needs three passes.
- An extension pole, a sturdy tray with liners, and proper painter's tape. The pole saves your shoulders and produces straighter, more even strokes than working off a ladder.
What to skip: paint sprayers for a single room, where masking and cleanup eat every minute the sprayer saves, and the gimmicky edging gadgets, which have never beaten a steady hand with a good sash brush.
Primer deserves its own decision rather than an afterthought. Dedicated primer is the right call over bare drywall, fresh spackle, glossy surfaces, and any dramatic color change — especially covering a dark wall with a light color. "Paint and primer in one" products are legitimate for repainting a similar color on sound, previously painted walls, which is exactly the situation most room refreshes are; they are not a substitute for stain-blocking primer over water marks or smoke, where only a purpose-made blocker stops the ghosting.
Pick the sheen before the color
Sheen — the gloss level of the finish — determines how the wall wears, and choosing wrong is a mistake you live with for years. The trade-off is consistent across brands, as Sherwin-Williams' sheen guide lays out: flatter finishes hide surface imperfections but scuff and resist washing, while glossier finishes take scrubbing and moisture but highlight every wall flaw, so high-traffic and damp rooms want the more durable end of the scale.
| Sheen | Best for | Trade-off |
|---|---|---|
| Flat / matte | Ceilings, low-traffic walls, imperfect plaster | Hides flaws; hard to wipe clean |
| Eggshell | Living rooms, bedrooms, hallways | The all-purpose middle; lightly washable |
| Satin | Kids' rooms, high-traffic halls | More washable; shows roller marks slightly more |
| Semi-gloss | Trim, doors, kitchens, bathrooms | Scrubbable and moisture-resistant; highlights flaws |
Choose the color after the sheen, and test it properly: paint a large sample swatch — or use the peel-and-stick samples most brands now sell — on two different walls, and live with it through a full day of changing light. Colors shift dramatically between a store's fluorescent lighting, morning sun, and evening lamps, and the small chip in your hand always reads lighter than the same color wrapped around four walls. An hour of patience here prevents the most expensive mistake in painting: doing the whole job twice.
Cutting in and rolling
Work top-down through the room: ceiling first if it is getting paint, then walls, then trim last, so each stage's drips land on a surface not yet finished. Within the walls, the rhythm is cut in, then roll, one wall at a time.
"Cutting in" means brushing the borders a roller cannot reach — along the ceiling line, corners, trim, outlets. Do it first, one wall at a time: load the brush, tap off the excess, and lay a band a couple of inches wide along each edge.
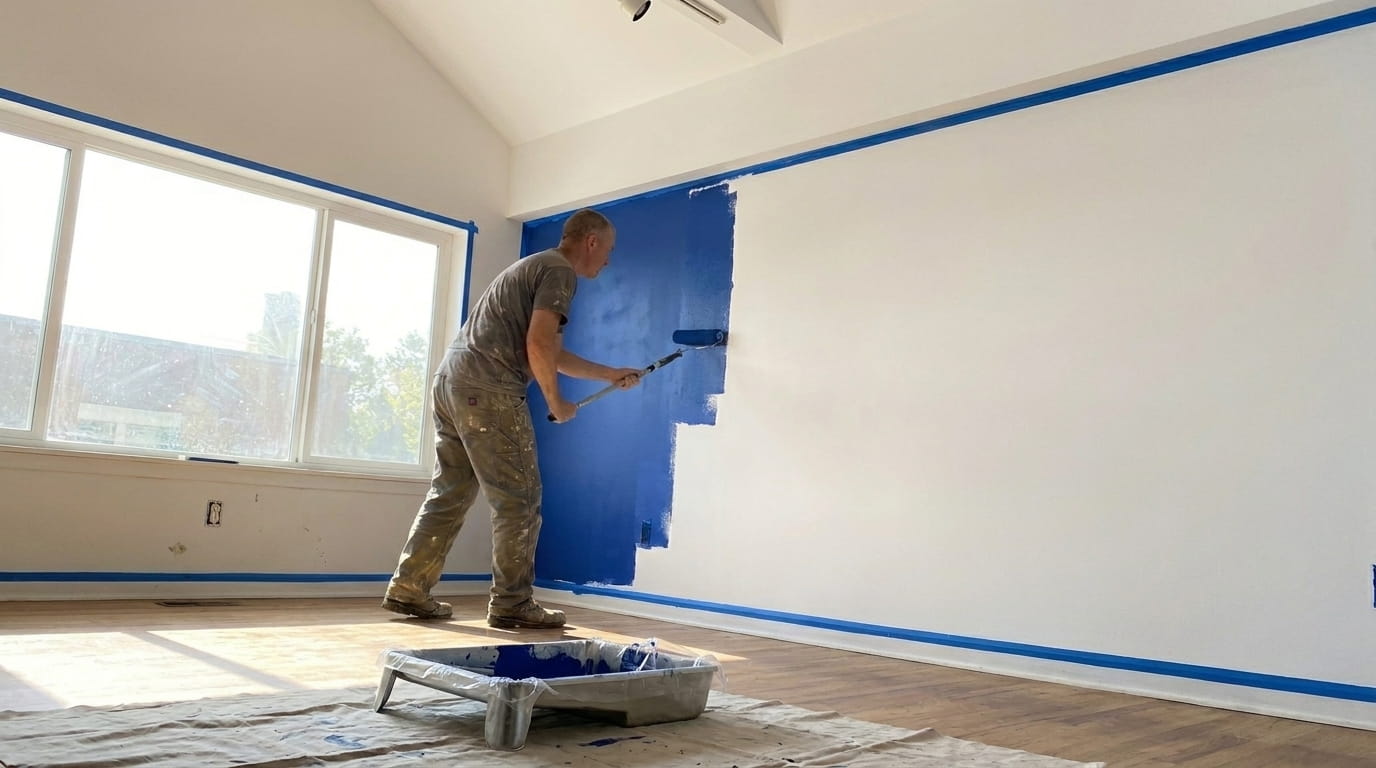
Then roll while that band is still wet so brush and roller textures blend instead of leaving a visible frame around the wall. Work in sections: roll a large W or M shape, then fill it in without reloading, finishing with light strokes in one consistent direction. Benjamin Moore's guidance is to apply only light pressure and let the roller and paint do the work — pressing hard leaves ridges at the roller's edges. Above all, keep a wet edge: always roll into paint that is still wet, never against an edge that has started to dry, or the overlap shows as a lap mark in raking light.
Roll into wet paint, never into dry; that one rule kills most of the streaks.
Coats, drying, and the tape trick
Two coats is the realistic answer for almost any color change — Benjamin Moore recommends at least two coats of the topcoat for full hide and color development, and a single coat that looks fine while wet almost always reads patchy once dry. Respect the recoat time printed on the can, usually two to four hours; rushing the second coat can lift the first into a gummy mess.
The tape rule that saves edges: pull the tape either while the final coat is still slightly wet, or after it has fully cured — never in between. Half-dried paint tears along the tape line in ugly flakes. Pull at a low angle, slow and steady. If you waited too long and the paint has dried over the tape, score along the edge with a utility knife first so the paint film breaks cleanly instead of peeling off the wall.
Know the difference between dry and cured. Latex paint is dry to the touch within an hour and recoatable within a few, but it keeps hardening for two to four weeks. Hang pictures gently in week one, hold off on scrubbing the new walls, and wait before leaning furniture against them — fresh paint that feels dry will still imprint and peel under sustained pressure until the cure finishes.
Ventilation and fumes
Fresh paint releases volatile organic compounds, and the concentrations indoors are not trivial: the EPA notes that during some painting and stripping activities, indoor VOC levels can reach many times — in extreme cases up to a thousand times — outdoor background levels. Its advice is simple: ventilate while you work and for the hours afterward, with windows open and a fan moving air out of the room rather than blasting the wet wall directly, which dries it unevenly.
Buying low-VOC or zero-VOC paint, now mainstream at every major brand, cuts the problem at the source and has become the default choice for bedrooms and kids' rooms. Whatever the can says, keep the room aired until the smell is gone, and let it breathe before anyone sleeps in it.
Cleanup is part of the air-quality story too. Latex tools wash out in warm, soapy water at the sink — work the paint out of the brush heel, spin it dry, and stand it bristles-up — while oil-based paint requires solvent, which is its own ventilation project and one more argument for water-based paint in living spaces. A well-cleaned quality brush outlives a dozen cheap ones.
The classic mistakes, so you can skip them
A few failures are so common they deserve their own list. Painting over a water stain without a stain-blocking primer guarantees the mark bleeds through both coats within a day — stains, smoke, and marker need primer, full stop. Bare spackle patches drink paint and dry as dull blotches unless spot-primed first. Dipping the brush past the bottom third of the bristles loads the ferrule with paint that runs back down as drips. An open tray skins over by morning; wrap the brush and roller airtight in plastic instead, where they keep overnight without rinsing, letting you split a room across two evenings.
When the job is done, treat the leftovers as an asset. Wipe the can's rim clean, press the lid on fully, and store it somewhere cool that does not freeze — labeled with the room and date — and future touch-ups take five minutes instead of a color-matching expedition. For genuinely unwanted paint, do not pour it down a drain; latex can be dried out with cat litter and binned in most areas, while oil-based paint counts as household hazardous waste and goes to a local collection program.
The last mistake is scheduling. Tired, badly lit painting is where streaks and misses happen, so stop at a natural break — a finished wall, never half of one — and resume fresh. Painting rewards patience more than skill, which is good news, because patience is free. And when an old shirt takes a casualty during the work, it has found its calling as a permanent drop cloth — the fate we recommend for genuinely ruined clothes in our stain-removal guide.
Sources & further reading
- How to Paint a Room in 7 Steps — Benjamin Moore
- Paint Sheen Guide: How to Choose Paint Finishes — Sherwin-Williams
- Protect Your Family from Sources of Lead — U.S. Environmental Protection Agency
- Volatile Organic Compounds' Impact on Indoor Air Quality — U.S. Environmental Protection Agency